Setting up BlazeDS with Flex
Let me give some introduction first.
BlazeDS is a server-based Java remoting and web messaging technology that allows to connect to back-end distributed data and push data in real-time to Adobe Flex and Adobe AIR rich Internet applications (RIA). Because of its open licensing, BlazeDS is not precluded from being used with other client platforms, such as JavaScript/AJAX. (wikipedia)
Adobe Flex is a collection of technologies released by Adobe Systems for the development and deployment of cross platform, rich Internet applications based on the proprietary Adobe Flash platform. The initial release in March 2004 by Macromedia included a software development kit, an IDE, and a J2EE integration application known as Flex Data Services. Since Adobe acquired Macromedia in 2005, subsequent releases of Flex no longer require a license for Flex Data Services, which has become a separate product rebranded as LiveCycle Data Services. (wikipedia)
Setting up JAVA:
Install the java sdk (jdk) and setup the environment by setting up the following two variables.
Setting up BlazeDS:
BlazeDS can be downloaded from: here. We will be using the turnkey download as it is preconfigured.
Now unzip blazeds in any folder. In my case I unzipped it to: “D:\Blaze_ds”
Now I will be setting up a new project in this directory: “D:\Blaze_ds\tomcat\webapps\blazeds”
Setting up Flex Builder:
A 60 ay trial can be downloaded form: here
Download flex builder 3 and install it. I installed flex builder in: “D:\Flex”
Creating a new project:
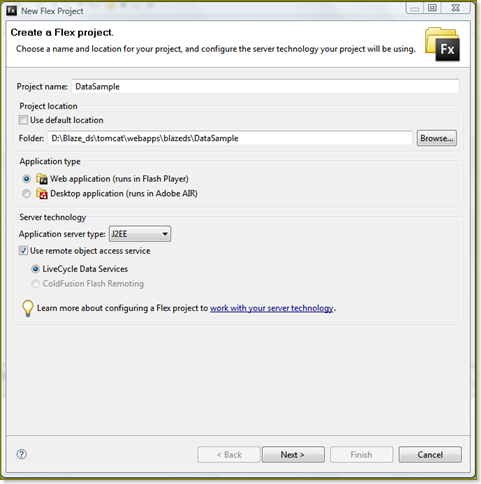
Now fire up flex builder and create a new flex project inside it.
Now fill in the appropriate entries and click on the “Validate Configuration” button. Now before you click on the button Tomcat needs to be started or the configuration won’t be validated. To start the server start a console and navigate to bin directory of Tomcat which is “D:\Blaze_ds\tomcat\bin” in my case. Now the configuration should validate. I have selected the current project directory as the output directory. Click on finish and a new project should be created.
The configuration is complete now. Just write some code to test the configuration.
1: <?xml version="1.0" encoding="utf-8"?>
2: <mx:Application xmlns:mx="http://www.adobe.com/2006/mxml"
3: creationComplete="consumer.subscribe()">
4:
5: <mx:Script>
6: <![CDATA[
7:
8: import mx.messaging.messages.AsyncMessage;
9: import mx.messaging.messages.IMessage;
10:
11: private function send():void
12: {
13: var message:IMessage = new AsyncMessage();
14: message.body.chatMessage = msg.text;
15: producer.send(message);
16: msg.text = "";
17: }
18:
19: private function messageHandler(message:IMessage):void
20: {
21: log.text += message.body.chatMessage + "n";
22: }
23:
24: ]]>
25: </mx:Script>
26:
27: <mx:Producer id="producer" destination="data_sample"/>
28: <mx:Consumer id="consumer" destination="data_sample" message="messageHandler(event.message)"/>
29:
30: <mx:Panel title="Chat" width="100%" height="100%">
31: <mx:TextArea id="log" width="100%" height="100%"/>
32: <mx:ControlBar>
33: <mx:TextInput id="msg" width="100%" enter="send()"/>
34: <mx:Button label="Send" click="send()"/>
35: </mx:ControlBar>
36: </mx:Panel>
37:
38: </mx:Application>
This is some code taken from on of the samples provided. I guess, it is as simple as it can get.
The destination given in the Producer and Consumer needs to be defined in the “messaging-config.xml” file which is located “D:\Blaze_ds\tomcat\webapps\blazeds\WEB-INF\flex\messaging-config.xml”.
Just add <destination id=”data_sample”/> inside the service tag.
Thats it. To test run application in two browser windows and the messages between the two windows showd be synchronized.


Hi,
I think your forward slashes have been removed while copying paths.
Thanks.
sazwqa
March 9, 2008
Fixed.
I guess this happened when I changed the blog theme.
techblogging
March 9, 2008
I followed the steps but I got the following error while validating
“Cannot access the web server. The server may not be running, or the web root folder or root URL may be invalid.”
Pl. help
pradeek
June 24, 2008
[…] Gaurav Sharma’s :- Setting up Blazeds with flex […]
Blazeds | Developer Stuff
August 9, 2008
I am getting this error?
Destination ‘data_sample’ either does not exist or the destination has no channels
Umer
September 1, 2008
Hello Sir,
Can I do this without Flex Builder, I know that the builder has a nice visual programing and bla bla bla. I have eclipse, BlazeDS and Flex 3SDK can I create “Web Project” in eclipse and run it against BlazDS and Flex 3 SDK?
Ninus
November 4, 2008
i have followed ,which u mentioned but i am not able to start the server.should i give catalina path in environment variable
kalai
August 12, 2009
I am getting a warning while configuring J2EE server it says “Cannot access the web server. The server may not be running, or the web root folder or root URL may be invalid”. But my tomcat server is running.
sujith
August 17, 2009