Creating a chat application using Socket in Silverlight
Here I will explain how to communicate with the server using the Socket class. The socket class allows Asynchronous communication between the client and server. This application will show how to share data in real-time in two different browser windows using Silverlight.
This application will contain two parts:
- Server application using Ruby.
- Client application using C# in Silverlight.
Creating the server application:
Making a multi-threaded server application in ruby is really easy and that is the reason I chose Ruby to create the server in least amount of time possible.
1: require 'socket'
2:
3: HOST = 'localhost'
4: PORT = 4505
5:
6: server = TCPServer.new(HOST, PORT)
7:
8: # array to store all the active connections
9: sessions = []
10: while (session = server.accept)
11: # push the current session(socket) in the array
12: sessions << session
13: # initialize a new thead for each connection
14: Thread.new(session) do |local_session|
15: # each time a client sends some data send it to all the connections
16: while(true)
17: data = local_session.gets
18: sessions.each do |s|
19: begin
20: s.puts data
21: rescue Errno::ECONNRESET
22: # an exception is raised, that means the connection to the client is broken
23: sessions.delete(s)
24: end
25: end
26: end
27: end
28: end
Save this file as chat_server.rb
This code is really quite simple and all it is doing is creating a new thread for each client connection and rejecting the invalid ones. Whenever a client sends some data it is propagated to all the clients.
Creating the client application:
This is the difficult part among the two. As I mentioned earlier I will be using the Socket class. The important instance methods of this class are:
- ConnectAsync
- SendAyns
- ReceiveAync
As their names suggest all of them are asynchronous. I am not sure of the reason. May be its because the communication does not block the UI thread and making it a bad experience for the client or may be its because of browser’s limitations.
Also in the beta-1 implementation the Silverlight Socket class only allows connection to 4502 – 4532 port range. I guess this limitation will be removed in the later versions.
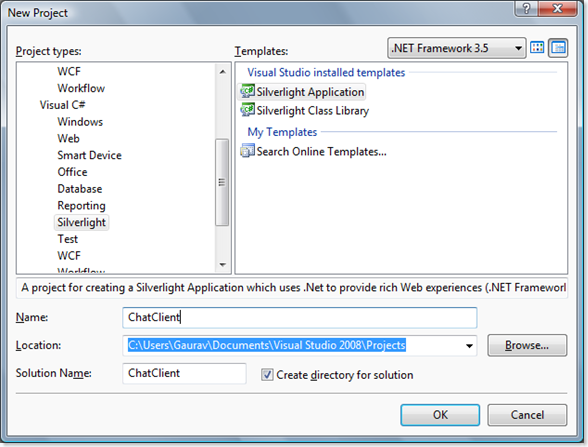
Open up Visual Studio 2008 (with Silverlight tools installed. You can also download a trial version of Visual Studio 2008 from here). And create a new project:
Name the application ChatClient and select rest of the default options.
Run the application. Visual Studio will prompt you to enable debugging, click OK to enable debugging and continue.
Add the System.net assembly to add the Socket class to solution.
Now to make a connection to the server we can use the Socket class:
1: socket = new Socket(AddressFamily.InterNetwork, SocketType.Stream, ProtocolType.Tcp);
2: SocketAsyncEventArgs connectEventArgs = new SocketAsyncEventArgs();
3: connectEventArgs.RemoteEndPoint = IP_END_POINT;
4: connectEventArgs.Completed += new EventHandler<SocketAsyncEventArgs>(connectEventArgs_Completed);
5: socket.ConnectAsync(connectEventArgs);
Here IP_END_POINT is an object of DnsEndPoint class and basically points to the server. I will be showing the code for it later for simplicity.
In the above code I created an instances of Socket class and SocketAsyncEventArgs class. The latter does the event handling for the former. So when the connection is complete it will just ca a event handler and then we can start sending/receiving data to server.
Code for sending data to the server:
1: sendEventArgs = new SocketAsyncEventArgs();
2: sendEventArgs.RemoteEndPoint = IP_END_POINT;
3:
4: List<ArraySegment<byte>> l = new List<ArraySegment<byte>>();
5: l.Add(new ArraySegment<byte>(Encoding.UTF8.GetBytes(sendBox.Text + "\n")));
6:
7: sendEventArgs.BufferList = l;
8: socket.SendAsync(sendEventArgs);
Socket uses a List to fill the data buffer. I have appended a “\n” in the data so that it is handled properly at the server.
Code to receive data from the server:
1: void connectEventArgs_Completed(object sender, SocketAsyncEventArgs e)
2: {
3: e.Completed -= new EventHandler<SocketAsyncEventArgs>(connectEventArgs_Completed);
4: e.Completed += new EventHandler<SocketAsyncEventArgs>(receiveEventArgs_Completed);
5: transferBuffer = new byte[BUFFER_SIZE];
6: e.SetBuffer(transferBuffer, 0, transferBuffer.Length);
7: socket.ReceiveAsync(e);
8: }
9:
10: void receiveEventArgs_Completed(object sender, SocketAsyncEventArgs e)
11: {
12: String a = Encoding.UTF8.GetString(transferBuffer, e.Offset, e.BytesTransferred);
13: SetText(a);
14: socket.ReceiveAsync(e);
15: }
When the connection to the server is complete the client begins to wait for the server to send data. This is done by removing the old event handler an creating a new one to receive the data. Also we need to initialise buffer so that incoming data can be received in it.
That is the basic structure you need to make for Asynchronous data transfer using Socket class.
The full code:
Page.xaml.cs
1: using System;
2: using System.Collections.Generic;
3: using System.Linq;
4: using System.Windows;
5: using System.Windows.Controls;
6: using System.Windows.Documents;
7: using System.Windows.Input;
8: using System.Windows.Media;
9: using System.Windows.Media.Animation;
10: using System.Windows.Shapes;
11: using System.Net.Sockets;
12: using System.Net;
13: using System.Text;
14:
15: namespace DeleetThis
16: {
17: public partial class Page : UserControl
18: {
19: private Socket socket;
20: private byte[] transferBuffer;
21: private SocketAsyncEventArgs sendEventArgs;
22:
23: // contants
24: private static int BUFFER_SIZE = 500;
25: private static int PORT = 4505;
26: private static DnsEndPoint IP_END_POINT = new DnsEndPoint(Application.Current.Host.Source.DnsSafeHost, PORT);
27:
28: public delegate void SetTextCallback(String _text);
29:
30: // initialize stuff
31: public Page()
32: {
33: InitializeComponent();
34: socket = new Socket(AddressFamily.InterNetwork, SocketType.Stream, ProtocolType.Tcp);
35: SocketAsyncEventArgs connectEventArgs = new SocketAsyncEventArgs();
36: connectEventArgs.RemoteEndPoint = IP_END_POINT;
37: connectEventArgs.Completed += new EventHandler<SocketAsyncEventArgs>(connectEventArgs_Completed);
38: socket.ConnectAsync(connectEventArgs);
39: }
40:
41: // connection complete
42: void connectEventArgs_Completed(object sender, SocketAsyncEventArgs e)
43: {
44: sendEventArgs = new SocketAsyncEventArgs();
45: sendEventArgs.RemoteEndPoint = IP_END_POINT;
46:
47: e.Completed -= new EventHandler<SocketAsyncEventArgs>(connectEventArgs_Completed);
48: e.Completed += new EventHandler<SocketAsyncEventArgs>(receiveEventArgs_Completed);
49: transferBuffer = new byte[BUFFER_SIZE];
50: e.SetBuffer(transferBuffer, 0, transferBuffer.Length);
51: socket.ReceiveAsync(e);
52: }
53:
54: // incoming data
55: void receiveEventArgs_Completed(object sender, SocketAsyncEventArgs e)
56: {
57: String a = Encoding.UTF8.GetString(transferBuffer, e.Offset, e.BytesTransferred);
58: SetText(a);
59: socket.ReceiveAsync(e);
60: }
61:
62: // this process is asynchronous so we need to invoke the ui thread to set the received text
63: private void SetText(String text)
64: {
65: if (this.Dispatcher.CheckAccess())
66: receiveBox.Text += text;
67: else
68: this.Dispatcher.BeginInvoke(new SetTextCallback(SetText), text);
69: }
70:
71: // data sending
72: private void sendButton_Click(object sender, RoutedEventArgs e)
73: {
74: List<ArraySegment<byte>> l = new List<ArraySegment<byte>>();
75: l.Add(new ArraySegment<byte>(Encoding.UTF8.GetBytes(sendBox.Text + "\n")));
76:
77: sendEventArgs.BufferList = l;
78: socket.SendAsync(sendEventArgs);
79: }
80: }
81: }
Page.xaml:
1: <UserControl x:Class="ChatClient.Page"
2: xmlns="http://schemas.microsoft.com/client/2007"
3: xmlns:x="http://schemas.microsoft.com/winfx/2006/xaml"
4: Width="400" Height="230">
5: <Grid x:Name="LayoutRoot" Background="White">
6: <StackPanel>
7: <ScrollViewer Height="200" >
8: <TextBlock x:Name="receiveBox"/>
9: </ScrollViewer>
10: <StackPanel Orientation="Horizontal">
11: <TextBox x:Name="sendBox" Height="30" Width="365"/>
12: <Button x:Name="sendButton" Content="Send" Click="sendButton_Click"/>
13: </StackPanel>
14:
15: </StackPanel>
16: </Grid>
17: </UserControl>
Running the application:
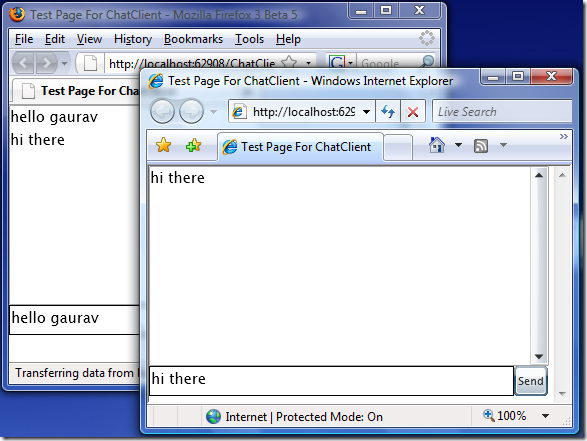
Now run this application in two different browser windows and whenever you type in one window the content of both windows should be updated 🙂
Download the source code:


Very nice and well explained.
cschuman
April 18, 2008
Thanks, Cschuman 🙂
techblogger
April 18, 2008
Awesome post, Gaurav!
Thanks for sharing this all.
–
sur
Sur
April 22, 2008
Thanks a lot Sur 🙂
techblogger
April 22, 2008
Very useful !! Thanks a lot
Memepuppy
May 30, 2008
Hi all,
Could you show me the way how to the Silverlight 2 beta 2 connect to Openfire (It’s a XMPP Server).
P/S An example code is better :).
Thanks!
MrHeo
August 24, 2008
Can you please tell me how to activate Ruby server?
I am not able to run this application so far. Please help me to run this application
Jatinder
October 16, 2008
@Jatinder: You just need to invoke this script using standard ruby like:
“ruby chat_server.rb”. Thats all you need to do to start the server.
I am not sure if I understand your question correctly.
techblogger
October 16, 2008